# A day in London
Start at the **British Museum**,
where entry is *free*.\
Get there by:
- Tube
- Bus
- ~~Car~~
> Tip: book a free timed ticket.
## Two sights
1. British Museum
2. Tower of London
| Sight | Price |
|-----------------|-------|
| British Museum | Free |
| Tower of London | Paid |
---
{width=15%
fig-alt="Big Ben's clock tower."}
Photo: John Dillenbeck, CC0.
Plan a route with
[TfL](https://tfl.gov.uk/).
Built with `quarto render`.
Stars kept, not italic: \*free\*
- [x] Contactless card
- [ ] Umbrella
```text
In a fence, **marks** stay put.
```6 Markdown, Rendering and Project Rules
Keywords
Quarto, reproducible publishing, coding agents, Markdown, Python, EPUB, data analysis, k-means clustering
The tourism office wants a visitor guide it can stand behind: a page anyone can open on a phone, every fact traced to a source, rebuilt rather than retyped when the facts change. Figure 6.1 is where Part II ends: the guide on its own website, with links to the same content in Word, PDF, PowerPoint, e-book and slide formats.
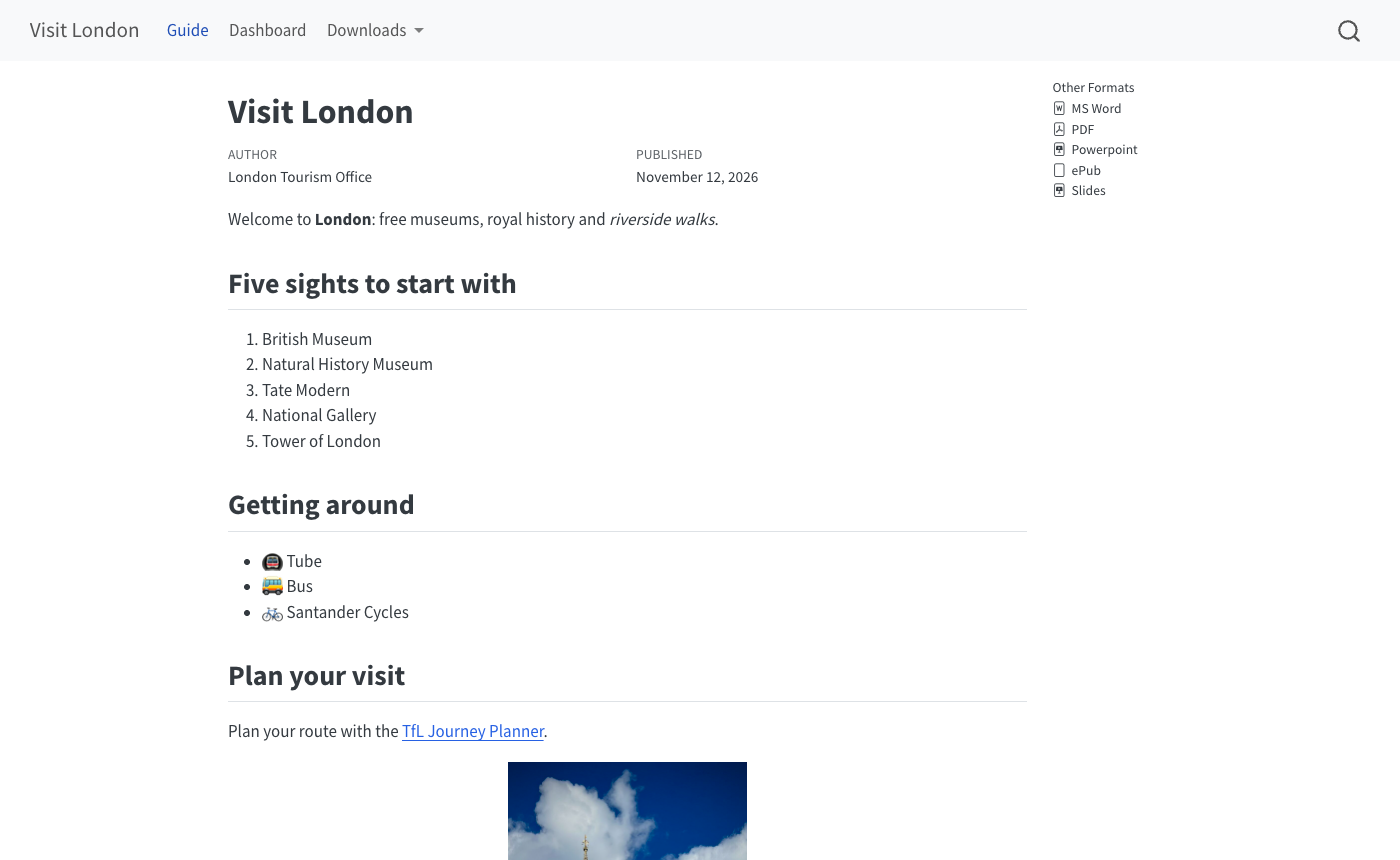
examples/london/london.qmd.
It starts as an empty folder and one plain-text file in Markdown, a way of writing structured text with a few punctuation marks. The agent writes most of it, but Markdown is what you check: the layer you review, compare between versions and fix by hand when a sentence is wrong.
More is new here than in any other chapter: a project the agent builds step by step, its rules, the preview and the environment. Work through it in order: read a section, paste its prompt and look at the result before moving on; each Try it box says what you should see by then. Every step ends the same way, as the first report’s did (Section 5.7): you read the change with git diff and commit it. When a step goes wrong, nothing is lost: one line pasted into the agent restores the chapter’s finished state (Section 6.11).
In this chapter
- Write a Markdown page: headings, lists, links, images, tables, fences.
- Render a file, and keep a live preview running beside it.
- Write project rules concrete enough to check, and hold each agent edit to them with
git diff. - Set up a project’s own Python environment with uv.
6.1 Markdown at a glance
Markdown is plain text in which a few symbols mean formatting. A # at the start of a line makes a heading; two stars on each side of a word make it bold. You type the symbols; when Quarto renders the file, turning it into a page, they become the formatting they stand for. A Markdown file is an ordinary text file whose name ends in .md: any plain-text editor opens it, and it reads well even before it is rendered.
This section shows the marks one at a time, before the first prompt; the sections after it use each of them in the guide. Each animation pairs what you type, on the left, with what you get, on the right. The right-hand side is not drawn: each step on the left was saved in a file and rendered by Quarto 1.10.20, and the right shows that page, enlarged. Each animation opens on its finished pair, which is all that a reader without animations shows, then types the source from the beginning.
Two things make Markdown safe to learn by trying:
- Nothing breaks. A mark that is mistyped, or opened and never closed, usually shows on the page as an ordinary character, and at worst formats the wrong words. Either way the page still renders, the slip is easy to spot, and you fix it by editing the text.
- Trying costs nothing. Type a few lines into a new file named
try.md, then runquarto preview try.mdin the terminal, in that file’s folder (Section 6.1.6). It opens the page in your browser, or prints an address to open, and updates the page every time you save the file; Ctrl+C in the terminal stops it.
6.1.1 Headings, paragraphs and emphasis
A line that starts with # and a space is a heading, the title of a part of the page. One # gives the largest heading, for the page’s title. Each extra # makes a heading one level smaller (Figure 6.2), down to six.

# for the largest, then ## and ### for each level down. The page is shown at a laptop’s width, where the three sizes differ most.
Ordinary text needs no mark. Lines that follow one another join into one paragraph, wherever you break them, and a blank line, a line with nothing on it, starts a new paragraph (Figure 6.3). So you can break a long sentence over several lines of the file without changing the page.

Stars round words emphasise them: two on each side for bold, one on each side for italic. Two tildes (~) on each side strike text through, for something no longer true. These marks come in pairs. Until the closing pair is typed, the opening one shows as typed, as at the start of Figure 6.4.

**bold**, *italic* and ~~struck through~~. Until its closing ** is typed, the opening pair shows as two stars.
6.1.2 Lists, quotations and lines
A line that starts with - and a space is an item in a bulleted list. A number and a full stop, such as 1., then a space, start an item in a numbered list (Figure 6.5). Leave a blank line above a list: without one, its items run on as part of the paragraph before it.

- and a space for a bulleted item, 1. and a space for a numbered one, with a blank line between the two lists.
A > at the start of a line makes a block quote: a quotation, set off from the text beside a bar (Figure 6.6). Start each of its lines with >.

> at the start of each line sets the lines off as a quotation.
Three dashes on a line of their own, with a blank line above and below, draw a horizontal rule: a line across the page that separates two parts of it (Figure 6.7).

--- on a line of its own, between blank lines.
6.1.3 Links and pictures
A link has two parts: the words to click, in square brackets, then the address they open, in round brackets, with no space between the two (Figure 6.8). Square brackets on their own show as typed. An address is often too long for one row of the screen, so the editor wraps it, showing the rest on the next row, as on the left of Figure 6.8. It is still one line, typed without pressing Enter.

A picture is written like a link with a ! in front: its caption in square brackets, then its file in round brackets (Figure 6.9). Here the file, hall.jpg, is in the same folder as the Markdown file. Section 6.7 adds what a published picture also needs: a size, and alt text, a description for readers who cannot see it.
. The page shows a photograph of the Natural History Museum's Central Hall, a vaulted hall seen from the top of a staircase, captioned Central Hall. The animation types the line, and the photograph appears once it is complete. The note reads: A picture, with its caption below.](../media/stills/md-image.png)
!, the caption in square brackets, the file in round brackets. Photo of the Natural History Museum’s Central Hall: Julian Herzog, CC BY 4.0, via Wikimedia Commons.
A picture can be a link too. Put the whole picture where a link’s words go, inside its square brackets: [](address) (Figure 6.10). The page looks the same, but a click on the photo opens the address, here the museum’s own page for visitors.
 inside square brackets, followed by https://www.nhm.ac.uk/visit.html in round brackets, wrapped over three rows. The page shows the same captioned photograph of the Central Hall as the picture without a link. The animation starts from the picture alone, types an opening square bracket in front of it and the closing bracket and address after it, and the page stays the same. The note reads: Click the picture to open https://www.nhm.ac.uk/visit.html.](../media/stills/md-image-link.png)
6.1.4 All the marks together
Table 6.1 and Table 6.2 gather the marks this book uses, those above and a few more, each with the section where the guide first needs it. Come back to them as you write.
| You type | You get |
|---|---|
# Visit London |
a heading; ## is the next level down (Section 6.3) |
| a blank line between lines | a new paragraph (Section 6.3) |
\ at the end of a line |
a line break inside the paragraph |
*italic*, **bold** |
italic, bold (Section 6.3) |
~~Car~~ |
|
- Tube |
a bulleted item (Section 6.6) |
1. British Museum |
a numbered item (Section 6.6) |
- [ ] Umbrella |
an item with an empty box; [x] ticks it |
To break a line without starting a new paragraph, end it with \. Two spaces at the end work too, but “the backslash is easier to see, and editors that strip trailing whitespace on save won’t remove it” (Quarto, Markdown Basics).
| You type | You get |
|---|---|
[TfL](https://tfl.gov.uk/) |
a link, TfL (Section 6.7) |
 |
the picture, captioned “Big Ben” (Section 6.7) |
> Book ahead. |
a quotation (Section 6.7) |
`quarto render` |
quarto render, in code type |
lines between ```text and ``` |
a code block, shown exactly as typed (Section 6.9) |
| Sight | Price | over |---|---| |
a table with a header row (Section 6.8) |
--- between blank lines |
a horizontal rule |
\*free\* |
*free*, stars and all: \ before a mark keeps it as typed |
Here is every one of those marks in one file, toy.md, a short London note with no settings and no code:
quarto render toy.md turns it into toy.html, Figure 6.11. Compare the two line by line: the lines of each paragraph have joined, except where a \ broke one; “Car” is struck through; the escaped stars round “free” and the stars inside the fence have stayed stars.
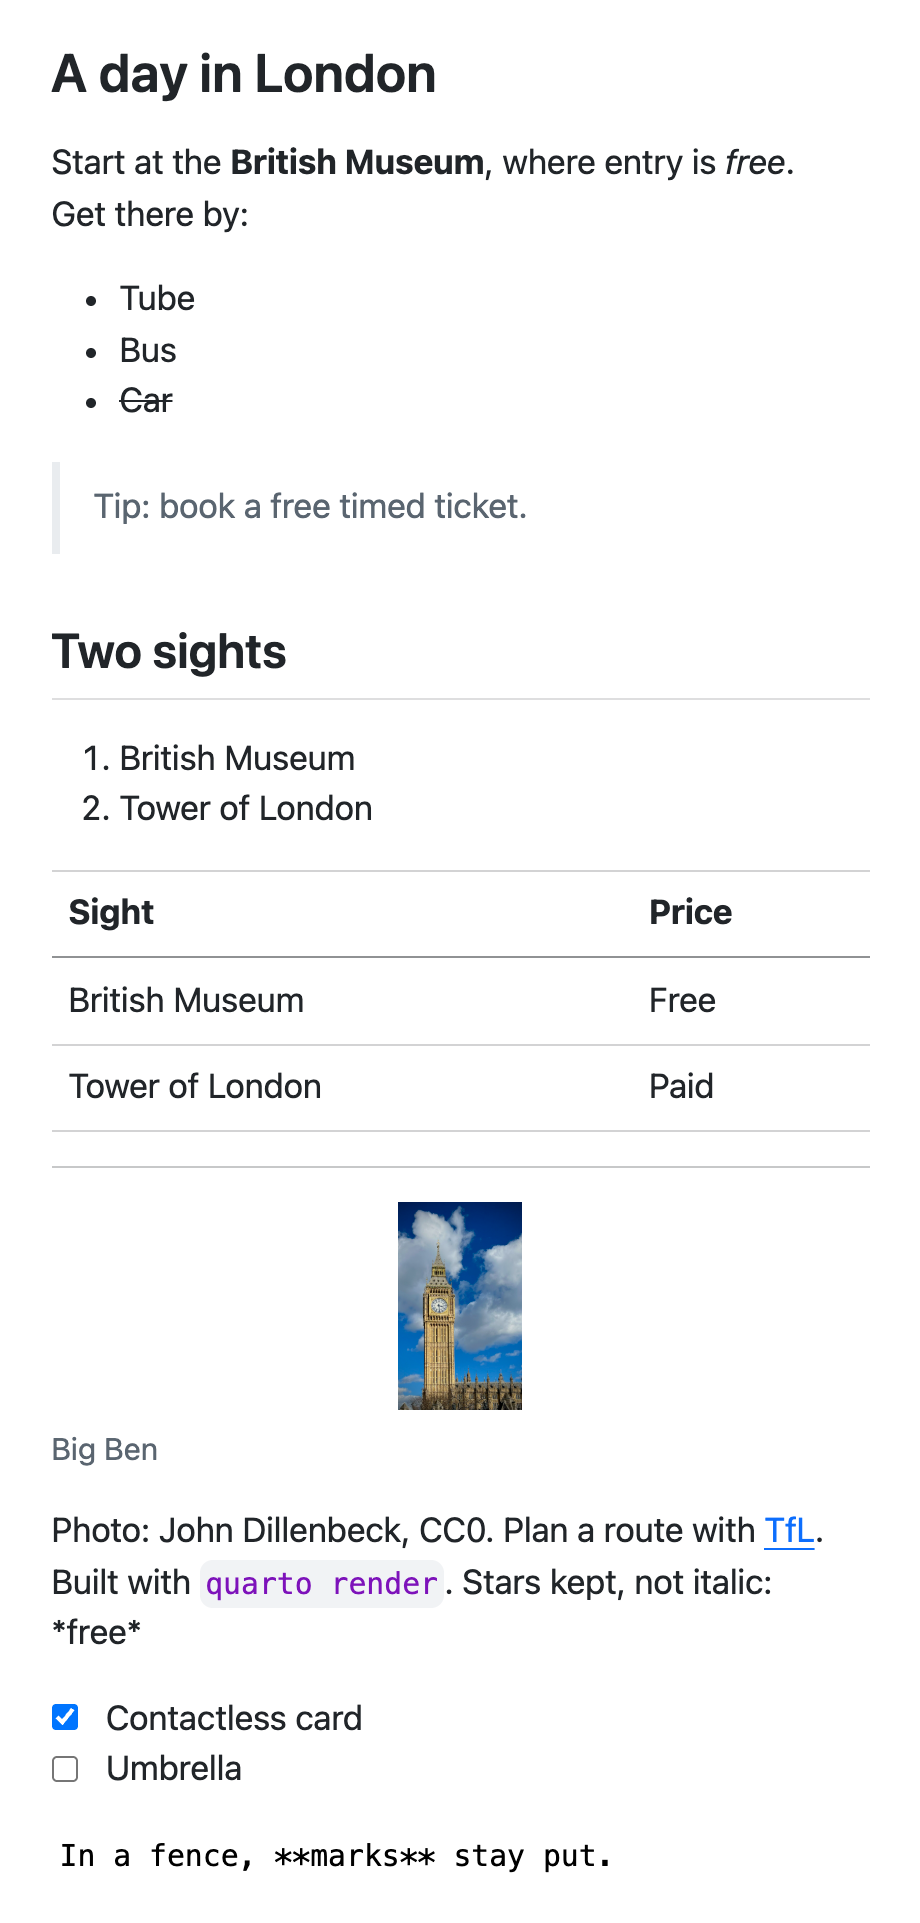
quarto render toy.md makes of the file, at a phone’s width: a screenshot of toy.html as Quarto 1.10.20 renders it. Photo of Big Ben: John Dillenbeck, CC0, via Wikimedia Commons.
Pause and think
A line of text, and straight under it, with no blank line between, a line of three dashes. Does the page show a horizontal rule?
Answer
No: the line of text becomes a level-2 heading. A line underlined with dashes is another way of writing one, in GitHub’s Markdown and Quarto’s alike, which is why the rule in Table 6.2 needs a blank line above it.
6.1.5 GitHub’s Markdown and Quarto’s
Markdown comes in dialects. GitHub Flavored Markdown (GFM) is the one GitHub uses for what people write there, such as README files and issues. It is “a strict superset of CommonMark”, a precise specification of Markdown, with five extensions: tables, task lists, strikethrough, automatic links and a ban on some raw HTML (GFM specification, version 0.29-gfm, checked 2026-11-12).
Quarto “is based on Pandoc and uses its variation of markdown as its underlying document syntax” (Quarto, Markdown Basics, checked 2026-11-12). Pandoc’s Markdown reads the same core marks as GFM, takes its task lists from it, and adds more: attributes in braces, footnotes, definition lists, citations and mathematics among them (Pandoc User’s Guide, checked 2026-11-12). Three differences catch people who learnt Markdown on GitHub:
- A list needs a blank line above it; without one, it runs on as part of the paragraph.
- Strikethrough needs two tildes,
~~Car~~, because a single pair,~2~, makes a subscript. - An image’s text in square brackets is its caption in Quarto, where GitHub uses it as alt text; Quarto’s alt text goes in
fig-alt(Section 6.7).
6.1.6 Two commands: render and preview
Quarto turns a file into a page with either of two commands, typed in the terminal in the file’s folder (quarto render --help and quarto preview --help, Quarto 1.10.20, checked 2026-11-12):
quarto render toy.md-
writes the output once, here
toy.html, and stops.--to docxpicks another format. Use it to make a finished file, the one you send or publish. quarto preview toy.md- renders the file, serves the page on a local address and renders it again each time the file is saved; Ctrl+C stops it. Use it while you write, in a terminal tab of its own.
A plain .md file needs no settings to render, as toy.md shows. Section 6.4 runs both commands on the guide.
6.2 A folder for the guide
The guide gets its own folder in your home folder, beside the quarto-workshop repository (a project folder with its Git history) that you cloned during setup (Section 4.6), so that its checkpoints are always at ../quarto-workshop/checkpoints/. By the end of the chapter your home folder, ~, looks like this:
~
├── quarto-workshop/
└── london-guide/
    ├── .git/
    ├── .gitignore
    ├── AGENTS.md
    ├── london.md
    ├── london.html
    ├── data/
    ├── images/
    ├── pyproject.toml
    ├── uv.lock
└── .venv/.git/and.gitignore: the guide’s history, which you start by hand, and the list of files it leaves out.AGENTS.md: the rules the agent reads first.london.md: the guide’s source, the file you check;london.htmlis rendered from it.data/andimages/: cited facts and credited photos, copied in and never edited.pyproject.toml,uv.lockand.venv/: the packages, their exact versions and the installed environment.
Make the folder and start its history by hand, as you did for the first report (Section 5.4), then open a list of what Git should leave out:
You do
cd ~
mkdir -p london-guide
cd london-guide
git init -b main
nano .gitignore
In nano, type these lines, one pattern per line, then Ctrl+O, Enter and Ctrl+X to save and leave:
.venv/
.quarto/
*.quarto_ipynb
*_files/
london*.html
*.docx
*.pdf
*.pptx
*.epub
The first four are the environment and Quarto’s working files. The rest are what the guide’s renders will write: web pages, Word files, PDFs, slides and e-books (a * stands for any characters). Each is rebuilt from the source at the next render, so a commit that held them would only hold copies that go stale. Web pages are listed by name, london*.html, not *.html, because one optional page later on, visits-3d.html (Section 8.5), is a source the agent writes, not a rendered file. Make the first commit:
You do
git add .gitignore
git commit -m "Leave the environment and rendered files out of Git"
git status now says nothing to commit, working tree clean, and it will not list london.html or .venv/ when they appear, because .gitignore names them. Keep this terminal tab for Git, and start the agent in a new tab, in the same folder (type codex or agy instead of claude if you use one of those):
You do
cd ~/london-guide
claude
Claude Code first asks whether you trust the new folder (Section 4.4): you made it for this work, so say yes. Codex asks the same question here, because the folder is now a Git repository. Later prompts copy files from ../quarto-workshop/, which is outside the project folder, so the agent asks your permission the first time it reads there. Approve it, or start Claude Code with claude --add-dir ../quarto-workshop to allow it up front (Codex has the same option, --add-dir).
6.3 A first page: a title and a welcome
Ask your coding agent
Create london.md with a level-1 heading "Visit London" and a welcome paragraph with one bold and one italic phrase.The agent writes:
# Visit London

Welcome to **London**: free museums, royal history and *riverside walks*.
# starts a heading, and the number of # signs sets its level: ## is the next level down. Double asterisks mark bold text and single asterisks italic. A blank line separates paragraphs. That is already a complete document.
Before anything else, see what the agent changed. In your Git tab:
You do
git statusOn branch main
Untracked files:
(use "git add <file>..." to include in what will be committed)
london.md
nothing added to commit but untracked files present (use "git add" to track)One new file and nothing else: the agent wrote only what it was asked to. git diff would show nothing yet, because it compares the files Git already tracks with their last commit, and a new file has no last commit: its whole text is the change. So read the file itself (cat london.md prints it), then commit it with a message that says why:
You do
git add london.md
git commit -m "Start the guide with a title and a welcome"
6.4 Watch it become a web page
Ask your coding agent
Render london.md with quarto render and tell me which file it wrote.
Expect it to run
quarto render london.md → london.html
You do
in a third terminal tab:
cd ~/london-guide
quarto preview london.md
open the address it prints · Ctrl+C stops it
The render writes london.html once. The preview (Section 6.1) renders it again every time london.md is saved, including when the agent saves it, so the page in your browser follows each change (Figure 6.12). It prints a line such as Browse at http://localhost:4200/ (the number varies) and usually opens that page in your browser; if it does not, open the address yourself.

london.md is saved (left), quarto preview renders it again and the page reloads (right). A real recording of quarto preview with the edits this chapter makes.
Keep the preview running from now on. It is the fastest way to check what each prompt did. git status in your Git tab lists nothing new after a render: london.html is a rendered file, and .gitignore leaves it out.
WarningCommon pitfall
A preview and a render of the same file at the same moment collide: both write temporary files with the same names, and one fails with an error such as readfile 'london.quarto_ipynb'. While a preview is running, let it do the rendering. Before the agent renders several formats at once (Section 7.5), stop the preview with Ctrl+C, and restart it afterwards.
6.5 Rules for the guide
Section 2.5 introduced AGENTS.md, the file of rules an agent reads at the start of every session. The guide needs one now, before any data or photos arrive, because every later prompt relies on it:
Ask your coding agent
Create AGENTS.md for this project. Scope: a London visitor guide for the tourism office, written once and reused for every audience. Rules: every number comes from a cited file in data/, photos are openly licensed, credited and show no people, never invent facts, keep data/ and images/ unchanged, and call ALVA counts "ALVA member attractions". Show me the file.
Expect it to run
writes AGENTS.md: a scope and a list of rules
You do
approve · read it: does it say what you meant?
Each rule is there for a reason the project will meet. Every number comes from a cited file: the guide quotes visitor counts, and an agent asked for a number it does not have may produce a plausible one; a rule that every figure is computed from a file with a source removes that temptation, and gives you something to check. Openly licensed photos with no people: a published guide needs images it may reuse, and pictures of identifiable people raise consent questions it does not need. Keep data/ and images/ unchanged: the inputs are evidence, and edits belong in the analysis, not in the evidence. “ALVA member attractions”: the counts come from the Association of Leading Visitor Attractions, which lists only its members, so “London’s most visited attractions” would overclaim.
The finished project’s version reads, in part:
## Rules

- Every number comes from a cited file in `data/`: each row carries `source`, `url` and
  `retrieved`. Never estimate or invent a figure or a fact.
- ALVA counts only its member sites: write "ALVA member attractions".
- Photos are openly licensed, credited from `images/ATTRIBUTION.md`, and show no people.
- Keep `data/` and `images/` unchanged.
Read what the agent wrote and edit it yourself if the wording is off. It is your project’s contract with the agent, and the rules work best when they are concrete enough to check. Any plain-text editor will do, or the terminal’s own: in your Git tab, nano AGENTS.md opens the file; Ctrl+O and Enter save it, and Ctrl+X leaves (Appendix B). Then commit it, as you did the first page: git add AGENTS.md, then git commit -m "Write the project's rules".
6.6 Five sights and how to get around
Ask your coding agent
In london.md, add a "Five sights to start with" numbered list (British Museum, Natural History Museum, Tate Modern, National Gallery, Tower of London) and a "Getting around" bullet list: 🚇 Tube, 🚌 Bus, 🚲 Santander Cycles.## Five sights to start with
1. British Museum
2. Natural History Museum
3. Tate Modern
4. National Gallery
5. Tower of London
## Getting around
- 🚇 Tube
- 🚌 Bus
- 🚲 Santander Cycles1. starts a numbered list and - a bulleted one; leave a blank line before a list. The five sights are the five attractions whose visits the guide charts later, from ALVA’s data. The list is a starting point, not a ranking. Among London’s ten most visited ALVA member attractions in 2025, the five, in the order listed, stand second, first, third, fourth and eighth; three attractions not on the list drew more visits than the Tower.
6.6.1 Read the diff, then commit
This is the agent’s first change to a file Git already tracks, so git diff, in your Git tab, has something to show:
diff --git a/london.md b/london.md
index df822e3..797957c 100644
--- a/london.md
+++ b/london.md
@@ -1,3 +1,17 @@
 # Visit London

 Welcome to **London**: free museums, royal history and *riverside walks*.
+
+## Five sights to start with
+
+1. British Museum
+2. Natural History Museum
+3. Tate Modern
+4. National Gallery
+5. Tower of London
+
+## Getting around
+
+- 🚇 Tube
+- 🚌 Bus
+- 🚲 Santander Cycles
Lines that start with + were added and lines that start with - removed; the others are unchanged lines shown for context. @@ -1,3 +1,17 @@ says that the three lines starting at line 1 are now seventeen. Yours will differ wherever the agent’s wording does. Check two things: every added line is one you asked for, and no other file is listed. Then commit:
You do
git commit -am "Add five sights and ways to get around"-a takes in every tracked file that changed, and -m gives the message, as for the first report.
TipIn practice
Make it a habit: after each prompt, once the preview shows what you asked for, run git status and git diff and commit with a message that says why. git commit -am covers changed files; a new file, or a new folder such as data/, needs git add . first, which adds everything new or changed that .gitignore does not leave out. Small commits, one checked step each, let you undo one step without losing the others. Once the habit is yours you can ask the agent to commit (“commit with a message that says why”), and read its diff before you approve.
6.7 Planning a visit: a link, a photo and a tip
Ask your coding agent
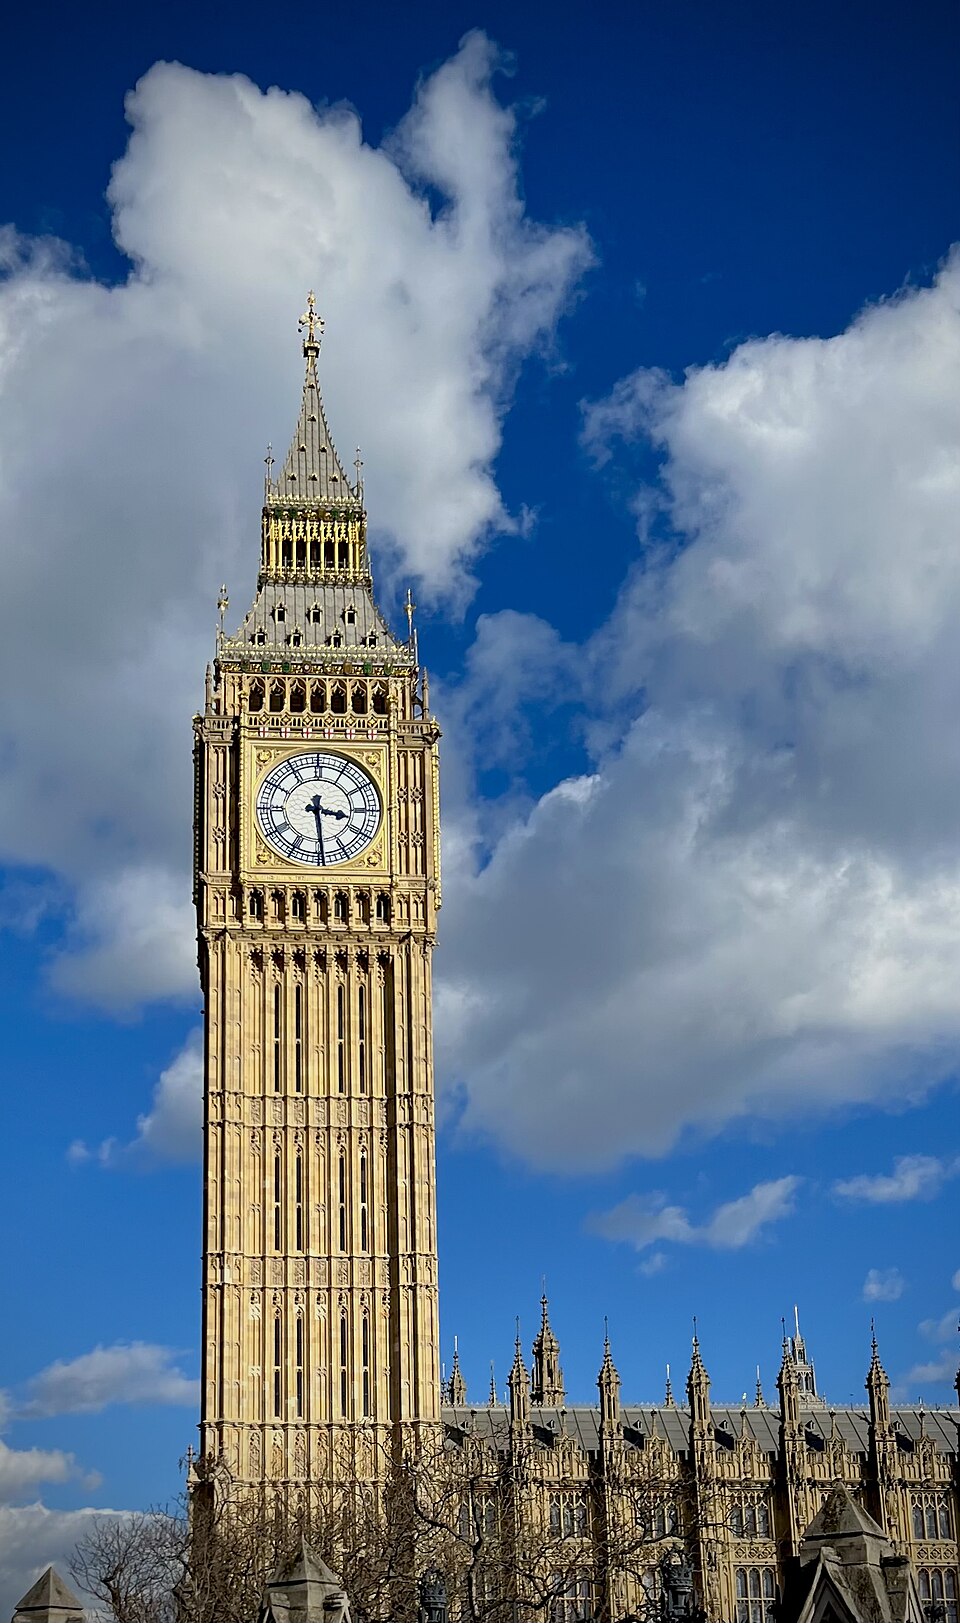
Copy ../quarto-workshop/examples/london/images here. In london.md, add "Plan your visit": a TfL Journey Planner link, images/big-ben.jpg at 30% width with alt text and a credit caption from images/ATTRIBUTION.md, and a "Tip from a local" blockquote.Plan your route with the [TfL Journey Planner](https://tfl.gov.uk/plan-a-journey/).
{width=30% fig-alt="Big Ben's clock tower and the Palace of Westminster against a blue sky with white clouds."}
> **Tip from a local:** many big museums are free. Book a free timed ticket to skip the queue.[text](address) is a link and  an image; the text in square brackets becomes the image’s caption. The {…} after the image is a Quarto and Pandoc extension: width sizes it and fig-alt holds its alt text, the description that screen readers announce and that appears if the image cannot load. > starts a quotation. Figure 6.13 is that photo.
NoteWhy this works
Alt text is not decoration. Without it, an image in a web page or e-book is announced as “image”, or not at all, to a reader who cannot see it, and a caption alone often says who took a photo rather than what it shows. Writing it is also a small test of whether a picture says anything: if the alt text is hard to write, the image may not be needed.
The photo was chosen by the rules: it is in the public domain (CC0), its licence and the absence of people were checked on its Wikimedia Commons page (2026-10-30), and the credit comes from images/ATTRIBUTION.md, which records each photo’s author, licence and source.
6.8 Sights at a glance, from cited data
The guide’s sights table needs facts: each sight’s price band, its nearest Underground station and its official page. They come from a file the agent copies, not from its memory:
Ask your coding agent
Copy ../quarto-workshop/examples/london/data here. In london.md, add a "Sights at a glance" table from data/sights.csv: a photo from images/ (height=60, no unit; alt text), Sight, Price band, Nearest tube and a "Read more" link to its `official_page`. Credit the photos (images/ATTRIBUTION.md) and the sources.data/sights.csv is a CSV file (comma-separated values): a table in plain text, one line per row, with commas between the columns. It holds one row per sight and fact, and every row names its own source and the date it was retrieved: fifteen facts from nine distinct pages. Table 6.3 shows three of them.
data/sights.csv. Each fact also carries its source (a description) and url.
| sight | fact | value | retrieved |
|---|---|---|---|
| British Museum | price_band | Free | 2026-10-30 |
| British Museum | nearest_tube | Tottenham Court Road | 2026-11-01 |
| Tate Modern | nearest_tube | Southwark | 2026-11-01 |
The table in london.md is plain Markdown:
| Photo | Sight | Price band | Nearest tube | More |
|---|-----|---|-----|----|
| {height=60} | British Museum | Free | Tottenham Court Road | [Read more](https://www.britishmuseum.org/visit) |Vertical bars separate columns, and the row of dashes under the header marks it as a header; the relative number of dashes sets the relative column widths. A link or an image works inside a cell.
The guide has no code yet, so the agent reads the file and types its values into the table: a cited copy of the facts, not a link to them. The next chapter makes numbers compute, and Section 9.5 shows what a copy costs.
Pause and think
The agent has filled in the sights table. How do you check that a price band came from the file and not from the agent’s memory?
Answer
Find that sight’s price_band row in data/sights.csv: its value, source and retrieval date are there. For a whole table, ask the agent to name the row behind each cell, then check a few of them yourself.
WarningCommon pitfall
Two traps in this one table. First, the PDF format made later (with Typst) rejects image sizes in CSS pixels, so {height=60px} fails with “cannot parse length”; a number without a unit, {height=60}, works everywhere, which is why the prompt says “no unit”. Second, a PowerPoint table cannot hold pictures, so the pptx version of the guide shows each photo’s alt text in its cell instead.
Some official sites, including the British Museum’s and Historic Royal Palaces’, answer automated requests with 403 Forbidden, so an agent that checks its links may report those two as broken. Open them in a browser before you believe it.
Commit this step with git add . first, so that data/ is committed with the table: from then on, Git shows you any change to the evidence.
6.9 A checklist that keeps its shape
Ask your coding agent
In london.md, add a "Before you go" section: a three-item checklist inside a plain text code block.## Before you go
```text
[ ] Contactless card or Oyster card
[ ] Free museum tickets booked
[ ] Comfortable shoes and an umbrella
```Three backticks open and close a code fence, and the word after the opening backticks names the language: text, python, bash. Text inside a fence is shown exactly as typed, which is why the brackets and line breaks survive. In the next chapter, writing {python} after the backticks instead of python turns a fence that is displayed into one that runs.
6.9.1 Spot the change you did not ask for
Suppose that after the checklist prompt, git status lists two changed files, not one:
On branch main
Changes not staged for commit:
  (use "git add <file>..." to update what will be committed)
  (use "git restore <file>..." to discard changes in working directory)
        modified:   data/sights.csv
        modified:   london.md

no changes added to commit (use "git add" and/or "git commit -a")
Pause and think
The prompt asked for a checklist in london.md, and nothing else. What do you do about data/sights.csv?
Answer
Look before you undo. git diff data/sights.csv shows what changed; here, shortened with “…”, one value in one row:
-British Museum,nearest_tube,Tottenham Court Road,"British Museum, Visit: …
+British Museum,nearest_tube,Holborn,"British Museum, Visit: …
The agent replaced the station the museum’s own page names with one from its memory, against the rule that keeps data/ unchanged. git restore data/sights.csv puts back that one file as it was at the last commit and leaves the checklist in london.md alone, so git status then lists only london.md. Commit that, and tell the agent what it did and which rule it broke. The scene is an illustration, not a recorded session; it is exactly the kind of change a summary such as “Added the checklist” would not mention, which is why you read git status and not only the agent’s report.
6.10 An environment for the code to come
A Python environment is a folder holding one version of Python and the packages a project uses, kept apart from every other project’s. Packages are the add-on libraries that Python code imports, such as pandas for tables or matplotlib for charts. The next chapter runs Python, and code never runs in a vacuum: what it does depends on the Python version and on the exact version of each package.
Getting all of that to agree used to be a lesson of its own: install conda or a system Python, sometimes a compiler, fix the PATH (the list of folders where the terminal looks for programs), register a Jupyter kernel, then debug it on every laptop. uv now does it in one step, for one project at a time. It fetches the Python version a project needs, and its lockfile, uv.lock, records the exact version of every package: it “captures the packages that would be installed across all possible Python markers such as operating system, architecture, and Python version” (uv documentation, checked 2026-10-31), so one file reproduces the same environment on every Mac, Windows and Linux machine. Other languages pair a project file with a lockfile in the same way: R’s renv.lock, JavaScript’s package-lock.json, Rust’s Cargo.lock.
NoteWhy this works
Why does the lockfile need to know the computer? Many scientific packages contain compiled C, C++ or Fortran, built separately for each operating system and processor (Intel and AMD x86_64, or Apple and other ARM arm64). Each package file’s platform tag, such as macosx_11_0_arm64, names the system it fits (Python Packaging Authority, checked 2026-10-31), so the lockfile lists the right file for every system.
Ask your coding agent
Give this folder its own Python environment with `uv`: run `uv init --bare`, then `uv add ipykernel nbclient nbformat pyyaml pandas matplotlib plotly`. From now on run `quarto` and `python` through `uv run`, and add that rule to AGENTS.md. Show me the Python line of `uv run quarto check jupyter`.
Expect it to run
writes pyproject.toml (the packages), uv.lock (their exact versions) and .venv/ (the installed environment) · adds a rule to AGENTS.md

uv init --bare, uv add with the guide’s packages, and Quarto finding the project’s own Python. A real recording with a demo account; the 40-second first render of the engine check is cut.
The four packages ipykernel, nbclient, nbformat and pyyaml are what Quarto needs to run Python cells; pandas, matplotlib and plotly are what the guide’s code will use. The larger jupyter package, with its notebook applications, is not needed.1
1 Measured in a dry run on 2026-10-30, on one fast connection, a cold install of the water analysis’s larger package set took 8 seconds with uv and 31 seconds with pip plus jupyter. That compares the old route with the new one, not the two installers like for like, since the pip run also installed jupyter.
NoteWhy this works
Why uv run in front of every command? Quarto refuses to run Python next to a .venv folder that is not activated (“There is an unactivated Python environment in .venv”). uv run activates the project’s environment for that one command, and first brings .venv up to date with uv.lock. So a copied project, or a checkpoint, rebuilds its own environment on its first uv run, and the rule in AGENTS.md keeps the agent using it after a restart.
Pause and think
Which file tells you the exact version of pandas the guide uses: pyproject.toml or uv.lock?
Answer
uv.lock. pyproject.toml lists the packages the project asked for, each with only a lowest acceptable version (pandas>=…); uv.lock records the one version installed, for every system. That is the file that makes a colleague’s uv run build the same environment as yours.
Commit this step too. git status lists the new pyproject.toml and uv.lock and the changed AGENTS.md, but not .venv/: .gitignore leaves it out, because uv run rebuilds it from uv.lock. So git add . and git commit -m "Give the guide its own Python environment" record everything a colleague needs to build the same environment, and nothing they do not.
6.11 If you fall behind
The preface set the rule, and drew its steps in Figure 2: stuck for two minutes, catch up. The line at the end of the last Try it is this chapter’s only catch-up, because its checkpoint holds the end of the whole chapter, whichever step you were stuck on. Pasted into the agent, it:
Expect it to run
backs up london-guide/ to ../london-guide-backup-01-<time> · copies the checkpoint in · renders london.md · checks london.html
Then carry on with the next chapter (Chapter 7). The README was written for the workshop, so the agent may also point you to one of its slides; in this book, the next step is always the one after the catch-up box. The README lists the same steps, which you can also run by hand (Figure 6.15). Nothing is lost: each backup is a new folder named with the date and time, so earlier backups are kept.

.venv/), the checkpoint copied in, and a render that rebuilds the environment from uv.lock first. A real recording with a demo account.
NoteWhy this works
The backup leaves out .venv/ because it can hold hundreds of megabytes and is rebuilt from uv.lock on the next uv run. Copying it would be slow and pointless.
Your history is kept too. A checkpoint has no .git/ folder, so catching up leaves your commits as they were, and the checkpoint’s files arrive as changes. For a reader who had committed every step before the environment (Section 6.10), git status then shows:
On branch main
Changes not staged for commit:
  (use "git add <file>..." to update what will be committed)
  (use "git restore <file>..." to discard changes in working directory)
        modified:   AGENTS.md
        modified:   london.md

Untracked files:
  (use "git add <file>..." to include in what will be committed)
        README.md
        pyproject.toml
        uv.lock

no changes added to commit (use "git add" and/or "git commit -a")
Review them as you would an agent’s change: git diff shows how london.md and AGENTS.md changed (the checkpoint’s rules add the uv run commands), and nothing in data/ or images/ is listed, because the checkpoint’s copies are the same as yours. README.md holds the checkpoint’s catch-up steps; Section 9.4 replaces it with the guide’s own. Then git add . and git commit -m "Catch up to checkpoint 01". Your own .gitignore stays, because the checkpoint has none.
Summary
- Markdown is plain text in which a few marks mean formatting; a mistyped mark breaks nothing and shows on the page, where you can see it and fix it.
- Markdown is the layer you read and check; Quarto reads Pandoc’s, which accepts GitHub’s marks and adds more.
- Plain Markdown renders with no settings; while a preview runs, let it render.
AGENTS.mdholds rules concrete enough to check, written before the data arrive: facts come from cited files, never from the agent’s memory.- After each step,
git statusandgit diffshow what the agent changed; commit what you checked, andgit restoreundoes one file you did not want changed. - uv pins the project’s packages in
uv.lock, anduv runuses them.
The guide still has no visitor numbers, because so far a number could only be typed, and a typed number goes stale the day its source is revised. The next chapter makes the guide compute them.
Further reading
- Quarto, Markdown Basics (checked 2026-11-12).
- GitHub Flavored Markdown Spec, version 0.29-gfm, and CommonMark (checked 2026-11-12).
- Learn Markdown in Y minutes (checked 2026-10-30).
- Pandoc, Pandoc’s Markdown, the full syntax behind Quarto’s (checked 2026-11-12).
- Quarto, Virtual Environments (checked 2026-10-30).
- Astral, uv project layout and the lockfile and running commands (checked 2026-10-31).
- Python Packaging Authority, Platform compatibility tags (checked 2026-10-31).